
For the long holiday weekend, I decided it would be nice to travel back to my hometown for a visit! The last few trips I’ve made over, I haven’t had time to work on my Fiat, so I decided this would be the trip that I would get some work done to it! My parents recently purchased a Buick Skylark GS 400 Convertible at the classic car auctions in Deadwood, South Dakota, so they have been prodding me to get my Fiat out of the garage, which may or not have played a small role in the decision to go work on it. So I asked my girlfriend if she would make the trip with me and help with the Fiat a bit. Amazingly, she agreed! So here is what we got done on my little Italian roadster!
I purchased this car quite a few years ago and while I was attending college, I would slowly fix things on it. Being Italian, it’s biggest issue has been rust. It wasn’t serious, but it was enough to annoy me. So I slowly cut out and replaced all the sheetmetal that had been eaten away at by the tinworm. I still have a few pieces to replace, but for the most part, the car is done on rust repair and bodywork fronts. When I bought it, it was already running, with a fairly new 2.0 liter engine and the rest of the drivetrain appeared to be fresh as well.
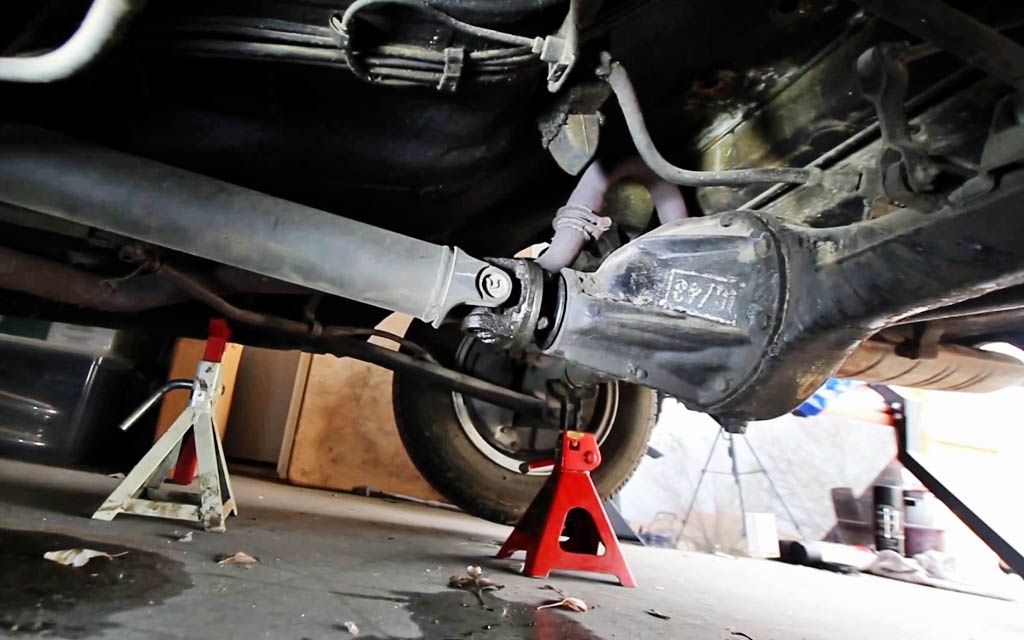
Being off at school meant that it would sit for long periods of time, be driven for a few weeks, and then go back into storage, which can wreak havoc on seals and gaskets. Amazingly, the only seal that has given up the struggle was the pinion seal in the differential. I actually covered that repair in this article!
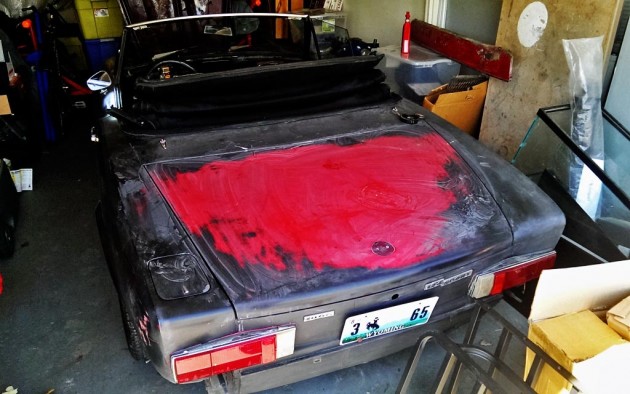
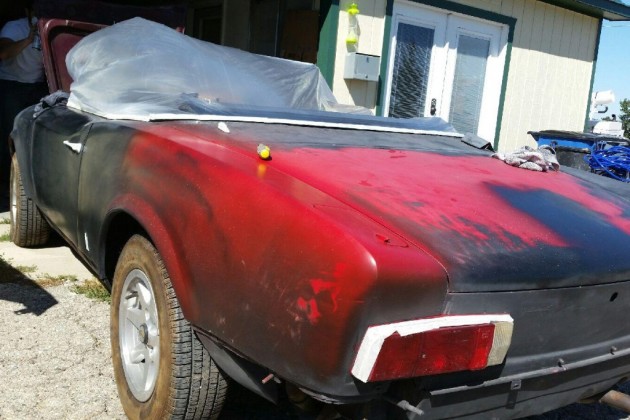
After replacing the pinion seal, I moved to Boise and the car has been parked since. The last time I tried to start it, I wasn’t getting any power to the starter. I assumed I must have damaged something in the process of fixing the pinion. So Monday morning, I crawled out of bed bright and early (I had to edit posts and moderate comments before I could do anything). After I finished my morning’s work, I woke my girlfriend up and we headed out to assess the Fiats situation. When we opened the garage door, there she was, looking eager to be revived. We rolled it out the garage and my girlfriend (Becca) remarked at what a neat looking car it was. She is still new to the classic car world, but already has good taste in automobiles! As I looked at it, a crazy idea came to mind. This car needed some paint! I’ve treated all the bare metal and rust prone areas as I’ve fixed them, which means the car is a patchwork of bright red paint, the original maroon color, and black primer. It really looked terrible!
And this is when the idea got really crazy! There are two things you all need to know about me. First, I like getting my hands dirty. Second, I will go to extreme lengths to save myself a buck. To say I’m cheap would be the understatement of the century. In my constant pursuit to save money, I’ve spent far too much time trying to find ways to paint a car on the cheap (if I would have used that time to make money, I could have afforded to have the car painted already!). I’ve looked at every option from Maaco to rolling on Rustoleum. Well I recently came across a rather fascinating product known as Plasti Dip. I’ve seen quite a few cars covered in the stuff and it usually looks pretty good, so I looked at Becca and said, “let’s dip this Fiat”. So we ran to the store and bought 6 cans of Graphite grey Plasti Dip, 3 cans of glossifier, some wet sand paper, and tape. Before we could lay down any dip, we needed to wet sand the car. We went over the entire thing quickly with 1000 and then 2000 grit, which left a nice surface.
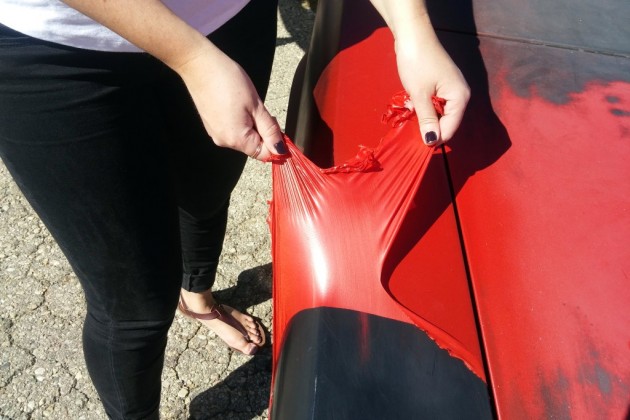
We then tapped off all the trim and anything we didn’t want dip on. There happened to be a can of red dip around the shop, so I did a test spot to see how the stuff works. After it dried, we were able to peel it right off, leaving a nice untouched surface underneath. I’m thinking this could be my new all time favorite product. I can make a car look like new without ruining the original finish. When I want to get rid of it, I just peel it off. And my absolutely favorite part, it’s cheap! I spent less than $50 for all the paint!
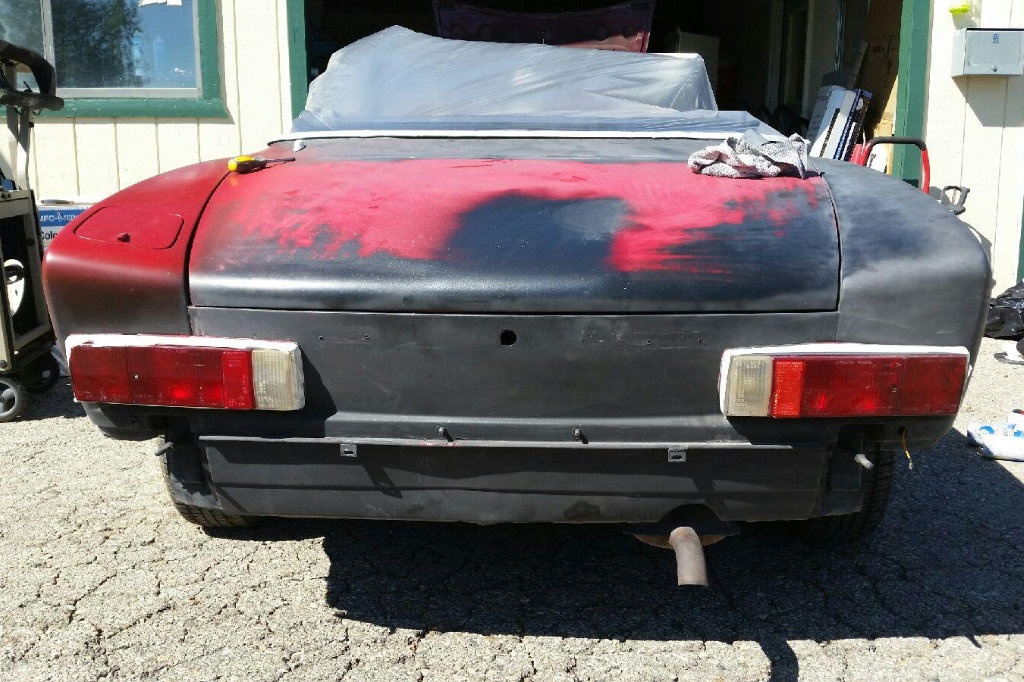
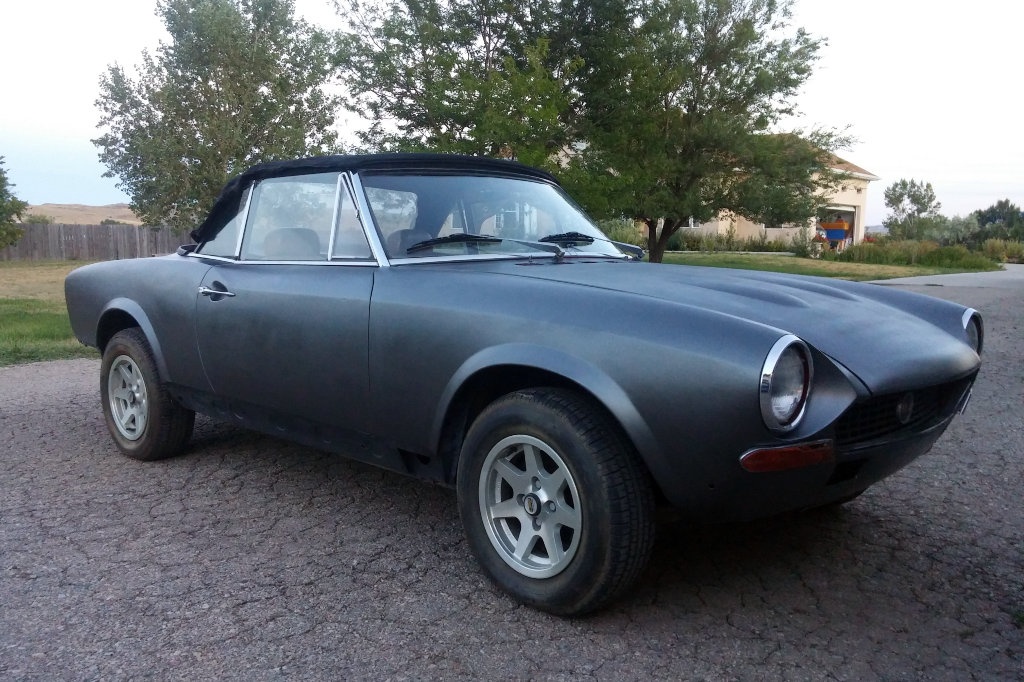
We spent the rest of the day laying down coats of dip. In hindsight, I wish I would have gone with the red. The graphite looks awesome, but didn’t lay very well. I had assumed it would be grey dip with metallic flake, but it turned out to just be straight flake. By the time we were done, we were both covered from head to toe in what I would classify as sparkles… I hate sparkles. It was nearly impossible to get the stuff to go down without leaving streaks. Some areas covered really well and look fantastic, while others are patchy. It looks good from about 20 feet, but any closer and you notice just how uneven it is. That’s alright though, because I can always peel it off and paint it red! Once we were finished with the clear coat (glossifier in the dip world) the car looked like a proper sports car. Now we just needed to get it running!
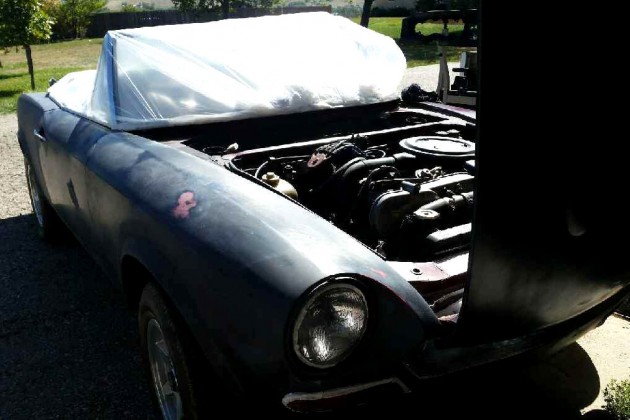
I still haven’t changed that darn timing belt, but I wanted to make sure the engine was still working correctly and hasn’t by some freak chance seized up. So I started checking the electrical systems, but everything looked great. I couldn’t find any disconnected or damaged wires. So we grabbed my dad’s truck and a set of jumper cables. We hooked up to the battery, but nothing would come on. Even after letting it sit for a few minutes, the engine wouldn’t even turn over. At this point, my dad had joined us and he was expressing concern about the motor. He even had me concerned about it, but then I decided to check the trunk mounted battery more carefully. That’s when I discovered that the battery was sizzling (definitely not a good thing). Once I removed the battery from the equation, all the lights came on and I was able to get the engine turned right over. I didn’t want to risk the timing belt breaking, so I didn’t mess with it anymore than that. But now I know I just need a new battery and a timing belt to get my Fiat back on the road! I was thinking about selling this sweet little machine, but with the dip on, I just can’t bring myself to part ways with this car, at least not yet. It helps that Becca loves the way it looks and has encouraged me to keep it (with the stipulation that I get rid of the Spitfire of course)! So I guess I better get to work on the Spitfire so I can find a new home for it!


well, the timing belt will take you much less time and aggravation…than getting the body “dipped”
Tips on the belt……..blow off center of head….remove the spark plugs………..remove the belt guard….put the pointers back on…. turn the motor so the cam pulley holes line up with the pointers.. THEN loosen the tensioner bolt. Use a long screwdriver to pop the spring off the stud , near the tensioner.,,,,,,slacken the tensioner and remove the belt.
DO NOT TURN the cams or crank..!…Put a new belt in place….with the SLACK SIDE on the PASSENGER side…. so the drivers side is ‘tight’… .
you can move a cam a LITTLE bit to get the belt cog to fit, then move it back…. use a medium screwdriver as a ‘prybar’ to put the end of the tensioner spring back over the stud… TIGHTEN the adjuster ..
Look carefully…..BOTH cam marks should still be lined up. You can move the crank a VERY small amount CW..CCW..CW to be sure BOTH line up.. ALWAYS check after turning Clockwise, as belt slack does NOT give a good reading CCW…..
MAYBE ..ONE cam will be off a tooth… slack the belt and FIX it NOW !
If it looks good…turn the crank CLOCKWISE…TWO full revolutions, to check that the cam marks still line up…DO NOT turn the crank backwards, unless you have resistance ( Piston hitting valve…)…….
Put the belt cover back on, and from under the radiator, look at the crank pulley and timing mark on the cover and make sure the timing mark line is TDC AND the Cams are being pointed to correctly
If you turn the crank AT ALL without the belt , you will have to put the belt cover back on to find TDC..do it WHEN distributor is firing on # FOUR, not #1
. Tighten the tensioner AGAIN !.. Call my cell while you are doing it, if you have problems. With the high dome pistons ans big valves we run, there is only .080 clearance, and this system works
Hey Dave, Thanks for the guide to changing the timing belt! This is far more detailed than any of the shop manuals I’ve looked at! I will have to put your number on speed dial before I change it, just in case!
Dave’s is correct but I will add a few things that I do.
1) I use a dial indicator that screws in to Cylinder 1 that confirms TDC. This is technically an alfa tool but Summit sells a similar tool. It keeps from putting the cover on and off again. Cylinder 4 is at TDC also but with the lean of the spark plugs the tool interferes with the firewall
2) I pull the idler pulley out and lop off the lobe, and put a grub screw in the oil hole. You can grind it off also. The reason is that you have to time the idler pulley with the lobe on there, otherwise it hit a connecting rod, and the only reason that the lobe is there is for a mechanical pump, and it has been years since I have seen a mechanical pump.
That is pretty much it. A good Fiat mechanic should have it done in a couple of hours
Kevin Harper
BIF Motors
Hi Kevin…yes, I agree.
we make a timing pointer that does not rely on the timing cover mark, and set it with a dial indicator.. but I didn’t want to get too technical on mods…..and we cut all the fuel pump lobes off if there is an electric pump
Josh, I love the look of the car without bumpers. I’d probably be too paranoid to drive it that way, but it looks great! Why does it sit so high? I know nothing about 124s, except that it is such a beautiful design.
I don’t know what year Josh’s car is. But, In 1975, Fiat added the heavy 5 mph bumbers and increased the ride height so the bumpers would be at the federally regulated level so that all cars would match.
This 124 is a late 1974, so it is kind of an in between model. The bumpers are the nice chrome bumpers from previous years, but they sit out further from the body and the ride height was already increased to get the bumpers high enough. I’ve already shaved the rectangular marker lights and will be installing the small round ones found on early and Euro spec cars. I’m also going to lower it a bit. I figure this car has already been modified with a 2.0 liter engine, so I might as well finish the job and make it my own!
~4th PARAGRAPH DOWN.. Josh, I suggest a correction in spelling, i.e.: ‘After I finished my morning’s work, I woke my girlfriend up and we headed out to asses the Fiats situation.’. I do believe you need an extra ‘s’ at the end, unless of course you dropped, ‘n interchanged a few words as well, ha. Great article btw.. Cheers
Haha thanks for pointing that out! All fixed!
Good article! I’m getting quite an education on Italian and Brit cars from this blog! One piece of advice: get some shoes on Becca’s feet! Dropped metal “aims” for unprotected feet. Even a bolt could be painful. By the way, I was going to say “nice nail polish, Josh” but opted for the high road. LOL
When I uploaded that photo I actually thought to myself, “someone is going to make fun of me for Becca’s nail polish.” I’ve been surprised that no one else has said anything about it! Thanks for taking the high road though! As for the shoe situation, trust me I tried. The best part is if something had landed on her feet, I’m sure she would have blamed me for not making her wear shoes haha.
Two things:
If you ever, with you guys, more like WHEN you decide to sell her (the car not Becca) put it in here first! I am NOT a Fiat guy but this one is talking to me.
Would you mind expounding on the “it would sit for long periods of time, be driven for a few weeks, and then go back into storage, which can wreak havoc on seals and gaskets” comment?? I have a BMW drop top that lives that exact life! While I have replaced numerous gaskets and seals, they all leaked from its prior life. That’s before I bought it. Due to cost, time, and agrivation I would really like to continue to have a clean garage floor!!
Basically I am looking for advise on how to not have havoc wreaked on my baby! More driving, regularly, is not an option due to travel and the fact that it is never driven unless it is dry, no snow, sunny…………..
Any input will be greatly appreciated!
I LOVE this site!!!
First off, lovely BMW! This is my favorite 3 series body style.
On the fluid leak front. There are a ton of opinions on how to keep cars that are frequently parked from leaking. Personally, I’m a believer in quality gaskets and making sure to regularly start the car and let it get up to temperature. A lot of guys just start them and shut them down, but letting them warm up insures fluids get into the gaskets and keep them hydrated (I’m not sure if that’s the proper term since its oil and not water). We’ve also had a lot of success moving our older engines over to 10-40 weight motor oil, its thicker and tends to have a harder time getting past the gaskets, but I wouldn’t recommend this with your Bimmer. It might be beneficial but I’d talk to a BMW expert first to make sure its alright for your engine. While you talking to them about the oil, find out what brand of gaskets they use for each part of the car. I used to always just buy the most expensive brand thinking it would work the best, but I learned with my Fiat, some times the cheap oil style gasket actually works better.
Now if your getting coolant leaks, I’d look into replacing the hoses and hose clamps. Also check the fittings to make sure they don’t have any cracks, rust, or other defects that can keep them from sealing.
My dad swears in putting stabilizers in the fuel and oil, he feels keeping the fluids commically stable and fresh, helps keep the gaskets fresh, but I haven’t seen any proof to back his idea, but it might be worth a try.
You might also look at buying a metal drip pan from Walmart. Jesse recently picked one up to keep under his MGB, it covers most of the floor under his car, was relatively cheap, and does a great job catching any drips. It’s not really a solution, but it can keep your floor looking better!
My last recommendation is my personal favorite, drive the car as much as possible! Nothing keeps a motor running better than being used! I know with convertibles that’s not always possible, but its definitely the funnest option!
Good luck and let me know if any of my tips work!
Thanks! I too always have always bought the “best” when it comes to parts for my vehicles. I usually open my wallet and buy BMW. I have a place that will install my supplied parts. It just gets tricky when and if you get into “it leaks” “well it was your parts” but so far we have not butted heads on that subject. Again, I agree with drive drive drive it! Fortunately, where I live, heated seats(I had them installed) windows up, and the BMW rear wind deflector allow for a few days usage in the winter. I am horrible about regular start ups due to being out of town often. I will have to work on that one. Again, thanks for the input!!
Great write-up, your spider is looking good! I have an 83 Pininfarina Spider I’v been meticulously restoring for the past 6 months. I have one concern though about the rear pinion seal. The ‘proper’ way of replacing the seal involves replacing the crush sleeve inside the diff, but to set that up properly the diff would need to be disassembled. A LOT of work. Most people just mark where the pinion nut is in relation to the pinion shaft and after replacing the seal put the nut back where it was. This saves a LOT of labor (6-8 hours or so), but it’s a bit of a hit an miss. My experience is that with the nut in the same place where it was, the pinion shaft will be a little loose. So it may take some experimentation to get it right.
Thanks Alex. It’s slowly coming together. I actually did the pinion seal not to long ago and I did it the easy way. I didn’t want to pull the whole thing apart to replace the crush washer. Here is what I did in hopes of keeping it sealed up. First, I marked it like you mentioned, then I used a torque wrench and measured how much force it took to break it loose. I wrote that number down, then tightened the nut figer tight, taking note how close it was to my mark. I then loosened the nut, counting how many turns it took to remove. I have a descent memory, but I wrote that number down too, just in case! I pulled the old seal, cleaned things up, put a little silicon on the threads, and put the nut back on, counting the number of turns to get it back on. Once I was back to the spot I noticed when I removed it, I grabbed my torque wrench and finished tightening it back to the original amount. I took the wrech off and checked my mark. Since it was spot on, I put the wrech back on and put just a little bit more torque on it, not very much, just enough to put a load on the crush washer. I can’t remember for sure, but my mark was only a few degrees past the starting point. This should ensure it keeps pressure but shouldn’t be so tight it causes any problems. And the silicone I out on the threads should hopefully minimize oil working its way past the nut. I hope that helps! Be sure to send us some photos of your Spider!
Did I miss something, Josh, or did you “forget to put a new seal in ” ????. LOL
Oh haha I did forget to mention that! Before you put the nut back on, be sure to put the new pinion seal in there! That’s the most important step in the whole process. Haha sorry!
Hi Josh, Do you have any videos on the work you did in the interior, body work and paint job? I have a white 1982 Fiat Spider 2000 that’s been sitting around and I decided it’s time to get it up and running but it needs work. I really like how your Fiat turned out.
Hi Edward,
I was looking back at old posts and just noticed your comment. So at this point, I actually don’t have any videos of the body work I did. I’m still working on getting all the interior bits though, so I will be sure to do videos of redoing the interior. I’m also getting a new convertible top and I will be sure to post videos of installing it. I hope you got your 124 back on the road! I’d sure love to see more photos of it.
Yes, made some progress with the restoration projects. Here’s a photo after some extreme body work. I had all of the dents and rust removed and painted back to it’s original while “blanco” color. I also ordered a new top to replaced the badly torn tan top. I’m actually going with “Bridgewater Blue” that I ordered from http://www.convertibletopguys.com. Plan to install this weekend.
With photo….