After getting the engine in our 1964 Volvo 122 running again, it was time to turn my attention to the brakes. There is no sense in going if you can’t stop! Hoses, caliper seals, wheel cylinders, and a new master cylinder were all ordered from RockAuto. I anxiously awaited their arrival assuming that the task of going through the brakes would be a simple one. After a few long days the parts finally arrived and the schedule was cleared. But, as is often the case with a barn find, the job was not that simple…
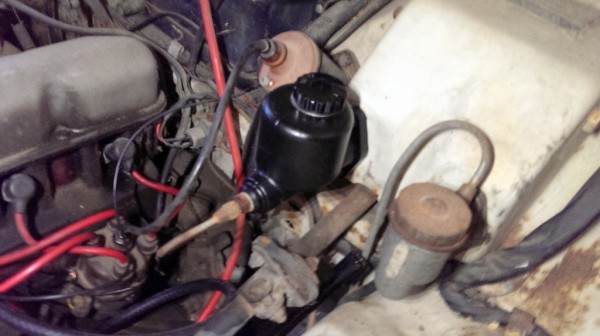
The first set back came when the parts arrived. My Volvo must have landed in the middle of a parts transition because the hoses the parts house sent me have a male fitting where there should be a female end. That could easily be fixed with a adapter, but instead of spending my time chasing around parts, I decided to focus on what I could do right then. So, after removing two bolts and a clip under the dash, a shiny new master cylinder was mounted to the firewall. The simplicity of a classic car is always appreciated when you do a job like this. Just remember that the pedal is spring loaded when you remove that clip or it could pop you in the head! Don’t ask me how I know…
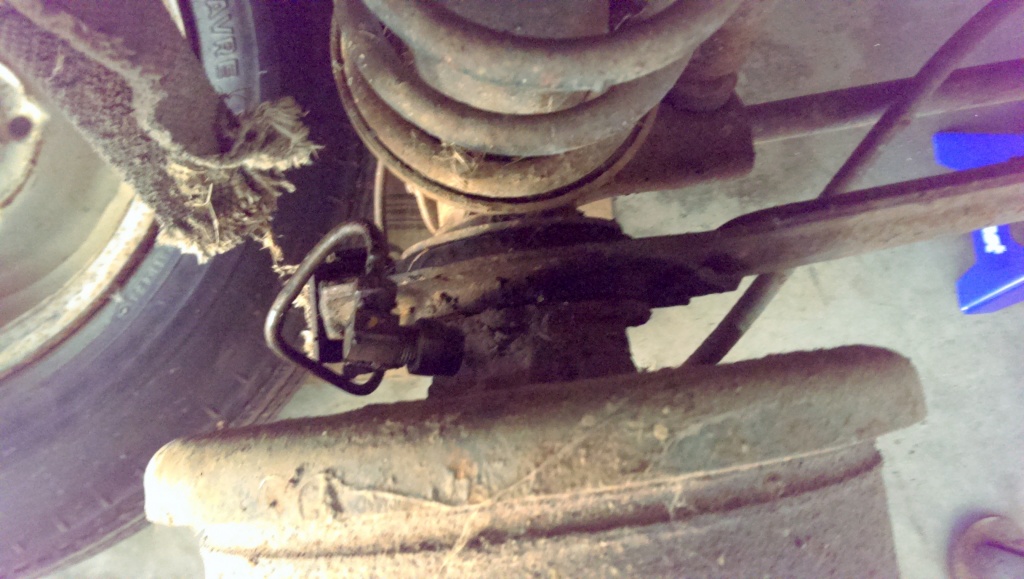
Before I even ordered the parts, I did do a little snooping to try and determine why the brake pedal was all the way on the floor. After inspecting each corner, I quickly spotted a wet area by the rear passenger side drum. After looking a little closer I noticed the brake line wasn’t even hooked up and was instead plugged with a fitting. If you look closely you will see what I’m referring too. That seemed strange to me. Well, and extremely dangerous. Running around with only three of the four brakes hooked up is never a good idea and could explain why this car was parked while still running. Turns out there was more to the story then that though.
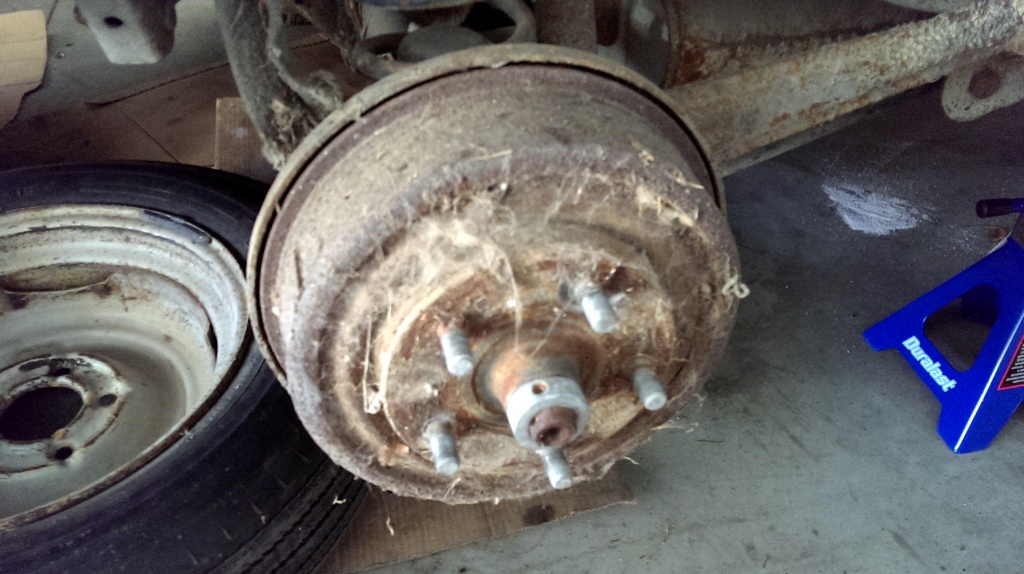
You may have spotted something strange in the first photo of this post. Where there should be a big threaded nut, there is a metal collar with a set screw. From what I can tell, someone stripped out or cracked the end of the axle (presumably with a cheap drum puller) so they pounded on the collar instead. It may have worked at the time, but it probably also made it hard to remove the drum come brake service time. That could explain why the line was unhooked? I was able to remove that collar, but have not had much luck removing the drum. Even if it does come off somehow, I will still need to replace that axle. At this point I am thinking that a whole new rear end assembly might be the easiest route. So, ironically my brake job has been halted for the time being…
The process of resurrecting an old car is exciting, but sometimes a seemingly simple repair can turn into a slippery slope. The journey is part of the fun though so follow along as I bring this ancient Amazon back to life!


You need heat, and lots of it. Time to bust out the torch
We all know that most jobs are not as simple as they first appear. That’s why it’s a good idea to make notes and take pictures. What you think you will assemble tomorrow afternoon, you may not get back to for months.
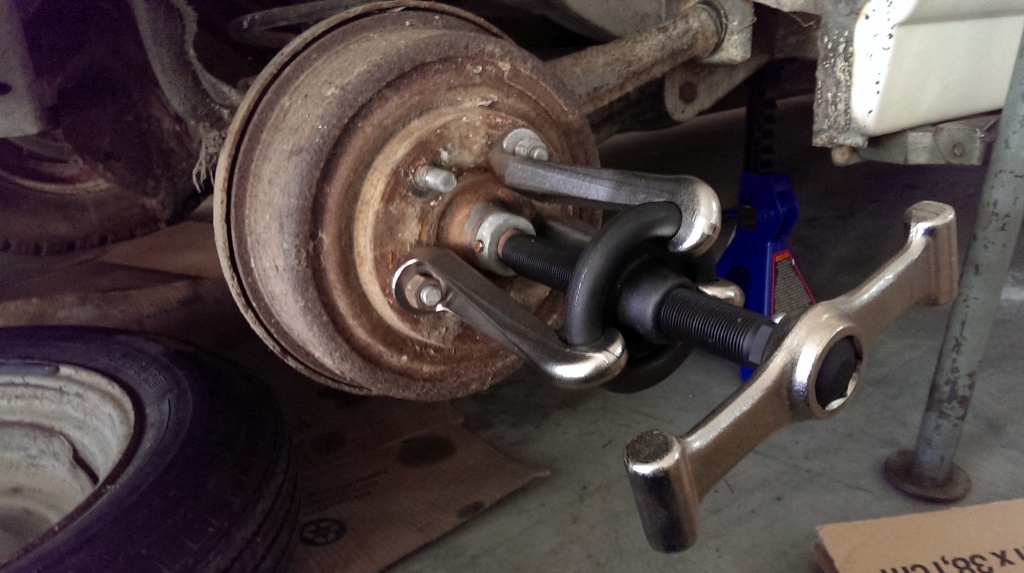
I’m concerned by that last photo. Do you have a puller attached to the wheel studs (which are attached to the drive flange, which is part of the axle shaft) and are pressing at the center of the axle? If so then the drum will never move as you aren’t effecting force on the drum, you’re only attempting to pull the studs through the drive flange.
The two most likely scenarios for a brake drum which won’t come off are:
1. The shoes are driven out to the drum and there is a large ridge on the drum face.
2. The face of the drum is rusted to the drive flange.
If the drum is a little bit “loose” but doesn’t come off then you’ll want to try adjusting the shoes inward to make some space. If the drum itself is rusted to the drive flange then a torch and some penetrant are the best tools for freedom. It’s hard for me to judge as the assembly isn’t in front of me, but at the outset the puller arrangement you have set up doesn’t seem like it can work at all.
Yep, apparently that is how you pull these. Here’s a nice writeup that explains the process: http://www.sw-em.com/Brake_Drum_Notes.htm
I see what you are saying. You may well be exactly correct. This arrangement does not APPEAR to be exerting force where it needs to be exerted.
I would think that the set collar needs to be removed from the axle shaft, and then one needs to pull from the edges of the drum. ( A near impossibility!) but that the studs would not be the proper place to be fixturing to… Supply a closer photograph????
I should have mentioned that the collar was removed before any serious pulling ensued.
Those 120 series drum brakes were always a problem to pull off. The factory tool used a wedge that you hammered on to pop the drum. Much cursing involved
Josh you might find this of interest:
http://www.volvo-forums.com/t39508-67-122s-rear-drum-removal-help.htm
..uh.oh…
Like the last guy, you have a ‘cheap’ puller…
The correct puller attaches to all 5 studs.
there is no “wedge”, and I don’t have to curse to make it work LOL
We do 444,s , 544’s, 122s’ all the time, and you will be hard pressed ( excuse the pun) to get the drum off easily with a 3 point puller.
I’ll post a picture of it when I get back to the shop
What a great picture! 444/544 heaven!
Are the wheel studs attached to the drum or to the axle? If they are attached to the axle your puller set up shown in the last photo won’t get the drum off.
STOP! Pulling the rear brake drums is the single hardest job on a Volvo 122s. Really. Everything else is a breeze compared to this job. You need a massive puller. It should be the kind of puller that you can whack on the end with a hammer. I bought one on EBay that is vintage. You need an old heavy duty puller here and you need Kroil or kerosense or whatever magic juice someone recommends (I use Kroil because it always works. You need patience. It is a tough job. Sorry to hear about the previous owner’s foibles. Don’t make the same mistakes. Move slowly and move big.
My puller looks like this. Perhaps you can borrow one locally?
http://www.ebay.com/itm/331484640710
I see you have just posted puller pictures…it is the blue puller in the last picture of pullers that is correct…not homemade, I bought mine
It’s the 3 leg one they show as “preferred” that needs some serious cursing, They only work occasionally, without busting something, like an axle, a stud, a hammer handle, or itself ( we’ve had all of them happen)
Thanks for the tip Dave! This three legged job is heavy duty, but hard to align properly. It’s easy to see the benefit of being able to attach to all five lugs. Is this the correct tool you are referring to? I took the photo from this site which has a nice little writeup: http://volvo-122s.blogspot.com/2013/10/fixing-rear-wheel-drum-brakes.html
Now, anyone know where I can find one?
That one will work..same design, different maker
………..NOTICE the diameter of the ‘screw’ and the fine thread …that will give you an idea of how much force it takes to remove most if these..
…………If you want to keep trying the 3 leg POS, you can call Joe Magarac and see if he can bring his hammer over, and beat on it a few times.
If you can’t locate one, I’ll ship you ours on loan with a deposit
[email protected]
Dave@old Scool is right on. There is a special puller that takes the 5 lug and a large taper bolt that goes into the center of the axle. IPD sells these pullers. Some heat is helpful but the puller you are using isn’t going to get the job done. That axle can be rethreaded, remember there is a keyway in there and a cotter pin wraps the job up. If you are going for a replacement rear, the wagon is different from the sedan, I believe the mountings may be different and in 1967 there was a different arrangement. I’d also replace those limiting straps, the look worn.
Just checked with IPD and they no longer carry the tool.
This is the correct puller
Looks like I may have to borrow Dave’s! IPD doesnt carry them anymore. SKANDIX has them for just $100, but shipping would take a while. And the local Volvo dealer wants $263.20 for one. Does anyone else know of any good sources to buy one of these at a reasonable price?
~ Man! Are you fortunate to have knowledgeable, experienced readers on tap with the correct advice to get you through the job. That almost never happens for me! With persistence and patience I do believe that you have it handled.
Assuming the end of the axle is still present it should work. I have pulled dozens of Volvo drums with a puller just like the one in the photo. I still have the puller. It is not as good as the 5 bolt versions, but it will work, make sure you work hard to even out the 3 legs. once it is quite tight, then you start pounding the center as you pound the nut tighter. Small sledge works well. In the early 60’s I worked as a Volvo mechanic.
OH Yeah, TOM … it worked in the 60’s , the drums had not been on for 50 years.
……Seriously tho’ , sometimes the 3 leg will work ( with a lot of cussin’ ), but this drum is a match fit taper on a tapered shaft, …. there is a LOT of loaded torsional surface, and it’s not really not possible to put much EFFECTVE heat to it, as the taper is so far in, the shaft expands along with the hub … If you can use a metal lathe, you know all about taper fit in the headstock and tailstock.
………….You can’t really get any EFFECTIVE spray in that far either, as un-like straight shafts and splines, tapers have have “0” clearance…the drum is actually stretched over the shaft when the axle nut is tightened………. like a Chinese finger puzzle
………But If I had to wait a few days to get mine shipped there, I’d be beatin’ and bangin’ on that three legged POS ,,..and cussin’…cause it won’t work without the cussin’
Josh, I’m with Mike (& Car 39 -:) ); LOTS of penetrant but “foam” the stuff on [VERY lite finger on the nozzle -:) ] which WILL help the stuff to ‘weep’ into where you want, AND do you have Factory Shop Service Manual for pic of ‘tool’ ? ? Try a local Dealer’s Service Shop — yeah, right – LOL ! !
Enjoy ! !
Ed
I “did” Volvos in the 70s. The Volvo dealer, I worked at, had been a Studebaker dealership from WW1, or before. We had an old Studebaker puller, that was a “hat” with 5 bolts, and a wedge, pushing on a heavy stud, through a slot. You put pressure on the stud, with a 4# hammer, then hit the end of the stud, again with the hammer.
be sure to have a junk nut on the axle.
lacking that puller, I’ve used a 3-jaw,(many, many times) as pictured. grease the pressure screw, build a lot of push, then smack with the hammer, on the end of the pressure screw.
The axle nut MUST go on tight, at least 150#
Rich
Im never quick to get out the torch,because you weaken the metal molecularly, for many years I fought drums by prying,trying to work the drum towords you,right,because youre trying to get it off,untill I finaly tried to take the drum off my own car.And it WOULDNT come off .I bit the bullet and finaly asked for assistance,a better mechanic than me told me to hit the drum,like your trying to install it instead of remove it ,hit between the wheel studs a number of times,then use the puller and bam,its worth a try
Ya’ll are crackin me up. The correct tool is SVO 1791 it looks like a combination of the blue one Dave pictured in so far as the t-handle and the one posted by Jessie. There is an additional tool for the inner bearing SVO 1794. Also my dad made a special tool for releasing the tension on the shoes. Get a # 3 Plathead round screw driver mark it about 4 inches from the tip and heat it enough so you can bend it about 30 degrees. Let it cool before ya try to use it. :-) just poke her in the hole and loosen the adjuster. Oh and ya might want to make sure that the parking brake is in the off posistion. I have had to partialy disassemble the cable assembly at the clevis only to fully release it. Besides the experience I got learning this, I also refered to my trusty CLYMER PUB for Volvo 122S and P1800 all years manual. It’s actually pretty good. I have an extra one if ya need it, Already broken in complete with grease stains and everything. I also have some 122S parts like an Automatic Tranny and some other misc stuff. Let me know if your interested. What I can tell you is that puller can be home made if your a clever man. Use the rim for your lug pattern to make a flange, Get some rigid pipe and thread the flange onto it. Then put a cap on the other end. Drill a hole in the end so you can get at least a 3/4″ fine threaded rod or bolt in it. Then use that to pull her off. Strength, Cussin and a BFH should be your last resort. Use your brain with the least amount of energy required. Save ya a lot of knuckles that way.
Like this?
http://www.swedishtreasures.com/18004.html
Part number SVO1791 picture: http://www.swedishtreasures.com/svo1791.jpg
@Alberto yes,
@Jessie If Oloff has one in stock, buy it from him, then resell it…
He is one of the best sources for 444,544,122s parts…we get most from him..
I went ahead and ordered one from these guys. Thanks for offering your tool though Dave. I figure it will be good to have one since there dont seem to be many around anymore.
the tool he lists, is the one I have ( SVO1791 ) and I can assure you, it works without cussin’ .
Most of the Rube Goldberg ideas above are well intended, but that kind of stuff is why you have a broken axle end already.
After breaking the axle, putting hat collar on is not only a joke, it is downright dangerous. Can you imagine loosing a rear wheel at 70 mph ??? Pay now, or pay later !
In the old days,the old Plymoths and Dodges had a very similar arangement. And this is what you would do if you lived out in the sticks or were pennyless.Take a 10 foot long chain and hook it to the lugs with the lug nuts,and then whip that chain.
The 3-jaw puller you show in your last image can and DOES work Jesse. I’ve got one and use it regularly to break the similarly-challenging 50s-60s Mopar tapered-hub rear drums loose. For the nastiest of those i work on – and since i can’t produce the massive amounts of heat required if the hefty 3-jaw puller itself won’t crack one loose, i’ve found a different last-resort method that, so far, has ALWAYS worked w/o adding heat.
May not work for you since it appears this car isn’t yet runnable under its own power (?), but here goes… I replace the center Washer & Castle Nut (Mopars use both), then back off 1 turn. Then reinstall the Wheel assy, attaching the puller underneath 3 of the 5 Lug Nuts. (Those 3 are firmly snugged but not tightened up strong like the remaining 2.) Next, the Puller’s Center Screw gets cranked up real tight to preload the Drum / Wheel Assy. Then she goes out for a drive around the hood and/or thru empty parking lots, weaving to left & then right under power, then decelerating on a turn, repeat, and whatever it takes until i hear that distinct ‘pop’, where the Drum/Hub releases to its 1-turn loose Nut on the shaft taper. Now i drive sloowly home for dis-assy.
For me, this always works for those super-tight ones which won’t pop loose in the Shop under strong hammer rotational blows to the Puller Spanner (the ‘dogbone’ shaped piece shown outermost in your photo). Guess this method may not work for your case since you have no Nut to back off 1 turn as a safety.
Anyone else out there used this method regularly? I learned it from a Mopar-experienced mechanic i met at a car show, who’d worked at a Chrysler / DeSoto dealer back in the 60s…
I learned the chain trick from an old(80+) man from Arkansas,said he loved the old Dodges. They aparantly were all female because he called them all “she”, ” she was Job rated”,”she was a big one” “she was a small one” In the ’50’s he was welding and he got a piece of slag in his eye,and when I knew him in the “70’s,he only had about 70% of his head,The rest had been removed,still outwork alot of todays whipersnappers
David G. partially penned:
“Anyone else out there used this method regularly?
Yep -:) ! ! “Perfect” method to free-up “real” Wire Wheels ! ! Just ‘loosen’ the “hub nut” leaving it mostly “snug” then drive in Figure 8s. Same result -:).
Ed
Jesse, research modifying your rear end with Ford axles and brakes.
Sounds like a lot of race and rally cars use the Ford axles. There’s not a lot of information about how to do it online though. Anyone here know how to do it properly?