If you have been following this site for any length of time then you already know that I have been driving a 1972 Volvo 145 to the office for the past few months. Snow, rain, or shine – I head out to the garage every single morning and climb into that seat. Once inside, I pull out the choke, push in the clutch, and turn the key. On some days she fires right up, but on cold mornings it can be a bit of a struggle. Since we have been busy getting the 122 running, I haven’t had much time to look into the problem, but the other day I decided to take an afternoon off to sort out a few annoyances.
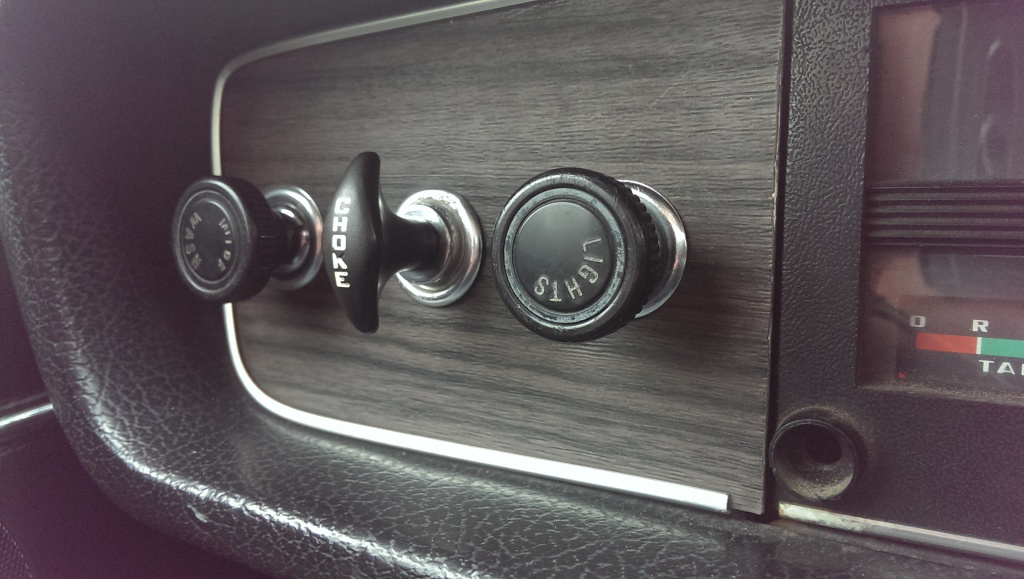
Driving an old car is not the same as driving a new one. Old cars can be cranky and they need much more attention to keep them operable. You have to actually check your oil every once in a while! This old Volvo has close to a quarter million miles and although it still runs strong, its starting to show its age. While some cars loosen up with wear, this Volvo has seemed to tighten up. The clutch has become harder to push in, the steering seems stiff, and the choke has become almost useless. After a little investigation it became apparent that I wasn’t able to pull it out enough to even help with cold starts.

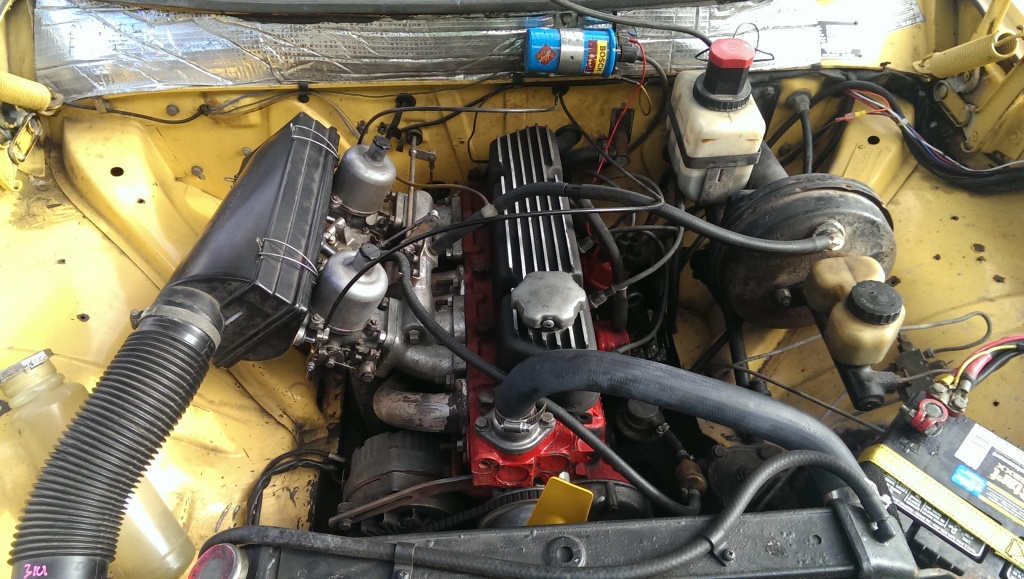
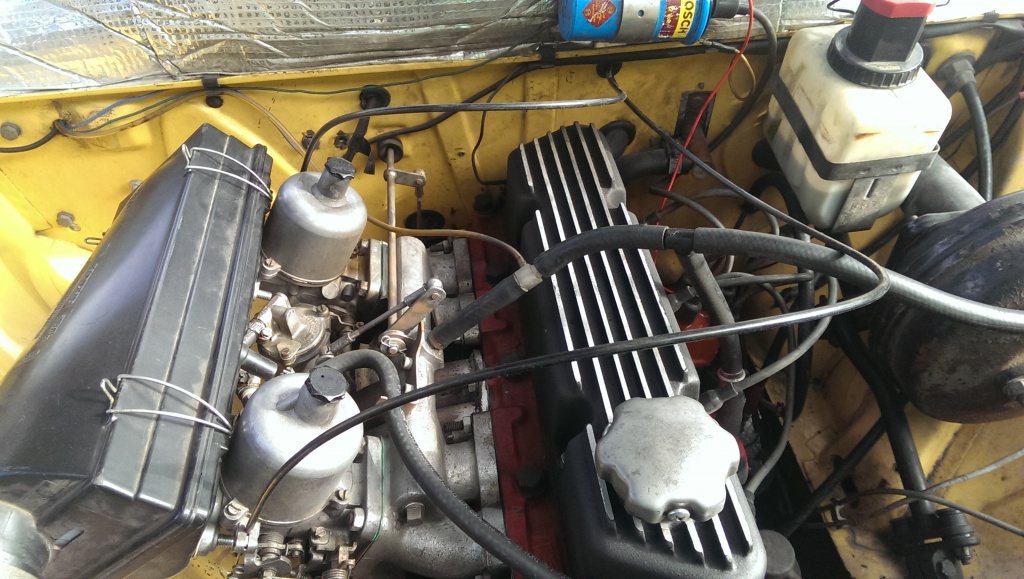
This car is equipped with dual SUs, but the principle of a choke is universal. It is a device used to enrich the mixture so a cold engine can start easier. It can do it by lessening airflow or increasing fuel. The choke on my SUs performs the later and it also engage a fast idle cam that speeds up the RPMs to help keep things smooth until the engine is warmed up. My choke wasn’t moving enough to even drop the jets that enrichen the mixture and was only moving enough to speed up the idle. Hench my starting problem. To address the issue I started at the carburetors. Here is a step by step list of what I did to get everything working correctly again.
- I disconnected the choke cables at the carburetors and inspected the mechanisms to make sure that everything was moming smoothly. If things are sticking at the carb, there isn’t any amount of lubricating you can do in the cable to fix the problem.
- They were working fine, so I went ahead and attempted to lubricate the choke cables. I used a chain and cable lube that I found at the parts store. I have read that you can mix anti-seize with a solvent and dump it down the cable, but a spray can with that little red tube seemed easier, so I went that route. You don’t want to use WD40 or anything greasy though. The WD40 will just evaporate and the grease will attract dirt causing more friction down the road. With really worn cables it might be best to just replace them though.
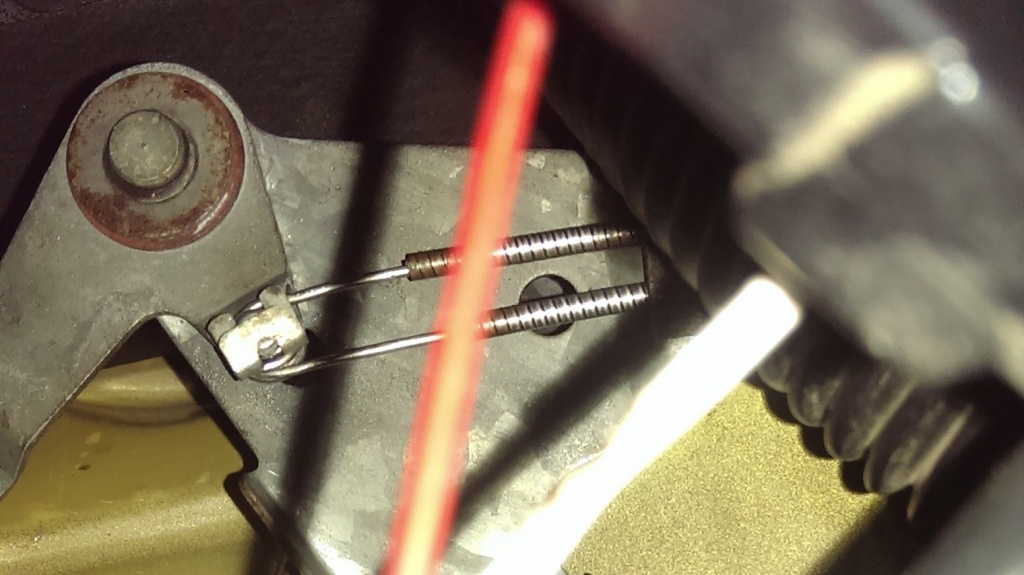
- Next, I took things apart inside the car so I could access the back side of the choke. The choke in my car uses a pivot arm with one side connected to the pull handle on the dash and the other side is connected to the cables.
- After pulling the handle section loose, it was easy to see that the pivot arm was the main culprit of our sticky situation. It was completely dry and very hard to move, so I squirted a little oil right around the rivet and bushing that holds it all together and then applied some lithium grease to the arms where they rub across each other. After moving it back and forth a bit, it loosen up. I then oiled the shaft that connects to the handle and squirted a little of that cable lube up the cables.
- Things were still a little rough, but I was now able to pull the choke all the way out! I just needed to figure out why things were still sticking a bit. So, I went back under the hood and started looking around. It struck me odd that both cables seemed to be the same length so I started pulling on each one. Apparently someone didn’t like the fact that one cable was longer than the other so they had shoved it back into the firewall. After pulling each out and making sure nothing was binding under the dash, pull smoothness was greatly improved once more.
- Finally, it was time to connect the pull cables back to the carbs. Whoever had worked on it last had neglected to use the cable clamps that keep the sheath from flopping around, so I made sure to connect those properly and to secure the screws that hold the cables themselves in place.
After putting the lower part of the dash back together and cleaning up, I attempted a start with the choke fully engaged. Not surprisingly, she fired right up! After tightening up some loose seat hardware and putting away all the tools, I took the old wagon out for a test drive. I know it was mostly in my head, but the fact that the choke was now working properly and that the seats were not rocking back and forth, I felt like the whole car seemed better to drive. It was more responsive and just felt good. Funny what a little grease and a few turns of a bolt can do!


Nice write up.
Going from an old one to a new one can present problems too. When my dad got the first car with fuel injection he couldn’t get why he didn’t have to pump the gas a couple of times to start it. I told him that wasn’t necessary anymore but he did it anyway. He said “It makes it easier to start”. OK Dad…
Nice job of leading us through the task, and glad it was so straightforward!
I’m contrasting this with the 20 minute online video I watched this morning on replacing the valve cover gaskets on an ’02 Camry V6. My best guess is that it would take me a day and a half of work to replace the gaskets, the rear of which leaks onto the exhaust manifold occasionally, because you practically have to disassemble the upper engine to get there. Among other parts, you have to remove the strut brace, entire intake system including the manifold, fuel rail, throttle body and injector wiring and the EGR valve and piping. Oh, I love the simplicity of classic cars!
BTW, the drivers of the Camry are going to have to live with the burning smell for a while yet…I’d rather be working on our TR6. :-)
Those Toyota V6 valve cover gaskets look harder in the videos than they are. I did them in my son’s 96 4 Runner and had it done in 90 minutes the first time. The second time (long story) I got it done in 45. Take pictures and mark all the cables and hoses as you disconnect them and it goes pretty smoothly. Order the kit with the new washers; the old ones are not reusable. The seals for the spark plug tubes are a bit tricky to replace; but not especially challenging.
Also, if you replace the EGR valve, the existing gasket in the valve cover will crumble when you remove it.
Go for it. It’s really not that bad and the best part is no more burned oil smell.
In my experience a little bit of maintenance like Jesse just described will take care of most problems that crop up with SU carbs. It’s usually high mile cars that have lacked the simple maintenance that’s needed for these carbs that develop problems. And don’t forget to use fairly thin oil in the dashpots, especially in very cold weather.
This is an excellent clinic that Jesse has just given for dealing with the dead simple maintenance that can make the difference between starting immediately or not starting at all on a cold winter day.
Call me old fashioned but I’d rather use some basic hand tools and some lubricant to keep my cars running, rather than a code reader and computer with the required software just to diagnose what’s wrong with the FI, or one of 3 different temperature sensors, or some other gizmo in the FI system. And that doesn’t even cover figuring out where to get the required gizmo or how to get there if the car is kaput.
yes well done. information in an orderly manner that others can use on their own vehicles. since you did it correctly it should be a longtime before you have to revisit.those parts. thanks
That first test drive after completing even the most minor of projects is always the best!
For really stuck and rusted parts, I know that gun smith’s like to use “Kreale Oil” (sp). Home Depot and Lowels carry it. It is suppose to loosen anything. They say is a creeping oil.
It is “Kroil Oil”. More info on: http://www.kanolabs.com/.
A good afternoon’s work ! Well written; well done.
Another common issue is the carbs that idle well but lean out at speed, or run well at speed but will not idle. This is more often the butterfly bushes than needle wear. So, while lubing the choke it is advise able to also do the butterfly shaft. It can be a source of airflow affecting the mixture when worn. Rebushing the body and replacing the shaft on a rebuild will result in an easy to tune set of SUs.
Suggest you guys with balky cables try this method I resorted to a few yrs ago to keep from breaking cables and keep them working smoothly for life: Get cable off car, use a length of pvc pipe with an ID large enough to swallow the fittings on one or both ends – so you can submerge all or most of the cable in the tube. Glue cap on bottom end, drill hole in top end for using a tie wrap to hang pipe on wall/wherever. Make up 2 of these tubes, because in the first one will go – if you think you can handle it safely – gasoline or other good solvent, but put tube in a safe place away from flames, electrical shorts, smokers, etc., or hang outside in safe place when you leave it to soak. Let cable stew overnight. Pull out next day, drain, put solvent tube in safe place or empty it safely. Use 2nd tube for lubing cable or reuse first one now empty (push/pull, speedo, tach, emerg. brake, clutch – any cable!) by putting now clean cable into it and filling to end of cable sheath with yr favorite 30wt or any good oil. Let soak overnight by hanging again. Next day, you’re ready to apply the long lengths of shrink tubing from the local electronics store which sells 3-4 ft lengths inexpensively, have a long flat area like a plank over a garbage can with newspaper on it prepped to receive the oil-soaked cable, and have your Hazard Fraught tools heat gun ready. Pull cable out of oil bath, drain excess into suitable receptacle or the pvc tube, slap down on plank, slide shrink tube over whole cable, line up ends with sheath, and shrink away. The shrinkstuff will trap the oil in the sheath very nicely, keep out water, and pretty-up the whole shebang – you can even get bright colors! and you can overlap several lengths/build up different diameters by layering anywhere along it, and bingo, you’ve got a cable lubed for life. Make sure to clean up any excess oil that oozes out during the shrinking, then install on car, and make sure said cable doesn’t ooze onto M’lady’s shoe.
For absolutely rusted solid cable like Ebrake ones, I remove ’em, soak in tube of WD, then beat the sheath gently on vise with hammer, tapping all over & rotating to break up solid rust – this usually gets the inner cable loose, just don’t pound the sheath to pieces. Then into pvc tube of solvent, sometimes spinning the inner cable with a low speed drill, using the spiral of the cable as a fluid pump to push the solvent thru the sheath. Not too fast or you’ll need a bath. Working inner cable in/out of sheath helps clean out the crud also. Then into the oil soak and proceed to coverup. Amazingly stuck cables almost always respond well to this treatment. And the shrink stuff can replace the outer plastic layer on nearly any cable – just strip off cracked, worn thru original plastic coatings with a knife and replace with whatever color you want.
Its guys like you I wish lived next door to me. I printed this one and will use your technique on my 1950 Dodge Route Van e-brake, choke and throttle cables. Great ideas and tips.
Ken Nelson just gave me an idea. I am going to use wire shrink insulation on my 544 twin SU cables. The choke wasn’t used from 1991 to 2011 and I loosened them up with wd40 and re adjusted them fine when I got the car and are fine now, but the shrink would keep them from drying out. Great thing is the choke cables retract over about a minute to act like an automatic choke shutoff. It works perfectly except for really cold days and I just pull it out all the way again after 30 seconds.
Glad you liked it Richard, and DRV, you’re right, WD dries up fairly fast, so it’s a good idea to at least dribble some 3in1 or heavier oil onto the spiral steel sheath of these pre-plastic-coated cables then seal it in with the shrink tube – you won’t have to pull the cable to dunk in a PVC tube – as long as you can get the end of the cable disconnected at the engine or wherever, you can wet the spiral with oil, quickly slip shrink tube over the end as far as it’ll go, heat shrink and you’re done and the oil will be forced into the cable between the spirals to the wire. That beats having to remove the whole cable from the car.
I found you can also build up the diameter of, for example, a steel fuel line or tank pickup if you don’t have the right size fuel hose. Putting on layers of shrink stuff on the undersize tube will build it up to where you can get a good seal with a larger hose. And as the shrink material I believe is a form of polyethylene or other fairly chemical-resistant plastic, at least the polyethylene is like milk bottle stuff and very similar to what they make portable gas tanks out of. But to be safe, put some of the shrink material in a small bottle of gas & let it sit for at least a week, then see how it behaves. The stuff is great for matching various mismatched diameters on things. If you’ve got long bolts exposed to the weather & want to prevent rust, just coat the threads with grease then shrink-wrap them – it’s easy to remove later. Just let your mind wander and you’ll come up with more uses –
nothing sounds better than SU carbs.
It’s so easy to make up up new cables using nylon lined outers, No lubrication need, but as all the outer sheathing I have seen in the past has been black. Cutting the Bowden Cable to length, again dead easy. Lay the cable on a firm steel surface, I used my vice, position a sharp engineer’s chisel at the point you want to cut and one smart blow with a hammer and hey presto one cut to length cable. The idea of using coloured shrink wrap sounds very attractive if you are looking for visual effect. Motor cycle experience, where the cables are totally exposed to the elements has been a good learning experience.
Weber dcoe or Ida sound better than SUs, but SU are way easier to tune for a novice,
I found while driving a small car in California with the manual choke, that they don’t like E10, which is about all you can get out here. It would flood when you pulled the coke, but start right up cold and no coke.
This might be useful….
the torque required to remove the nut from a
“scientifically rusted” environment.*
**
*Penetrating oil ….. Average load*
None ………………… 516 pounds
WD-40 ……………… 238 pounds
PB Blaster …………. 214 pounds
Liquid Wrench ….. 127 pounds
Kano Kroil ………… 106 pounds
ATF-Acetone mix….53 pounds
*The ATF-Acetone mix was a “home brew” mix of 50% acetone – 50% automatic transmission fluid.*