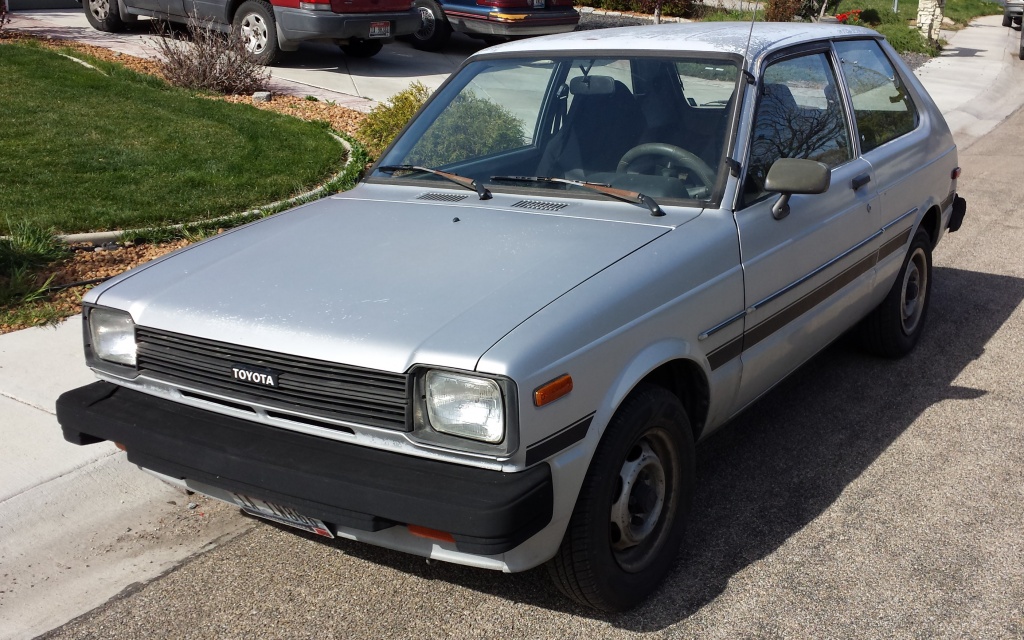
Well, I haven’t done any updates on our Starlet because there isn’t much to fix. These may have been some of the cheapest cars available when new, but they were well-built little workhorses. I have new found respect for older Toyotas now and will probably see a few more in my future. There are still some things I would like to sort out on this one though and I could use your guy’s advice.
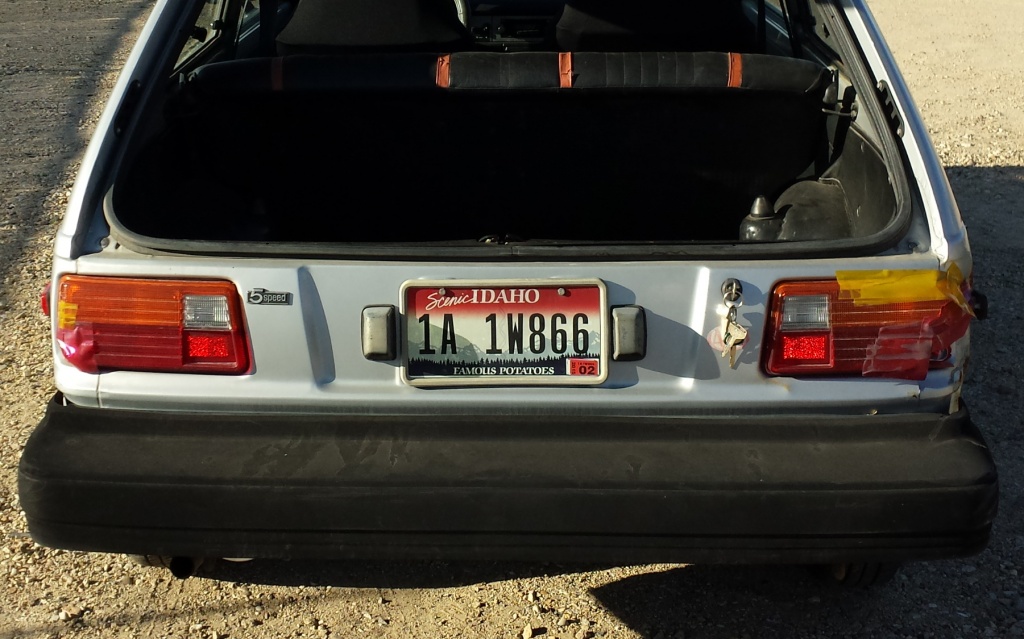
First off, we need some new taillights. Both sides have been backed into so they both have cracked lenses and the accompanying dings. I stopped by a paintless dent removal place the other day to get a quote on fixing the minor dent on the driver’s side and reupholstering the seats. They wanted $160 for the dent and $1,500 for the front seats! I headed home discouraged, but that same night after spending five minutes, I had the inner plastic panels removed and the dent popped out. It didn’t take any special tools (just my hand) and it saved me some money!
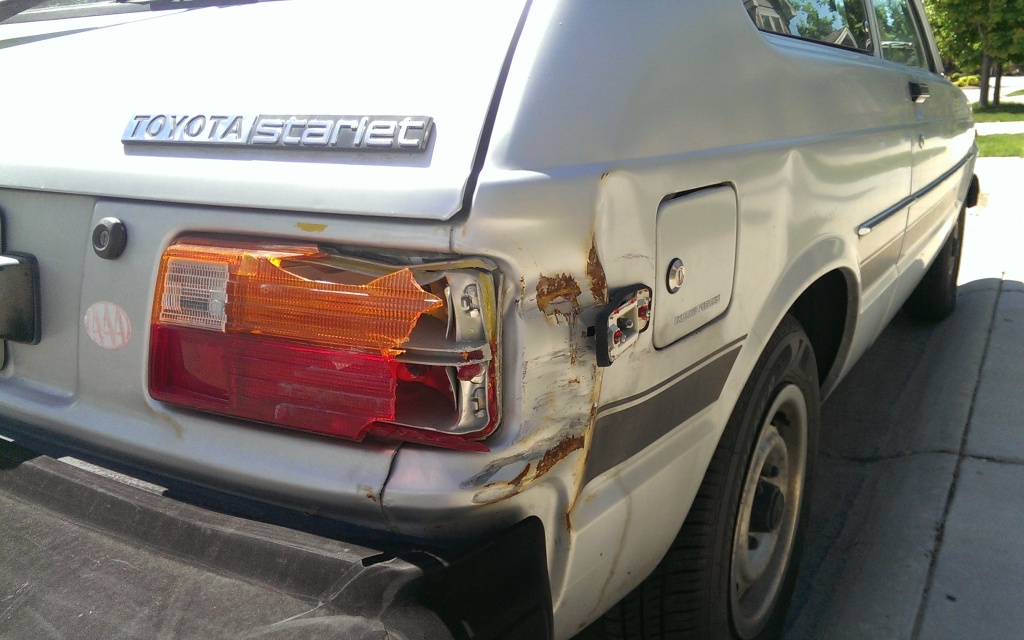
The other side will not be so easy though. The metal has actually creased a little and the paint is cracked. I haven’t had to mix bondo in years, but I am seriously considering a trip to the parts store to pick up metal shaping tools and some filler. I know you can get cans of color matched spray paint these days too, so I was thinking that might be an economical alternative to the paint shop. My dad used to do it all the time when the corners of his work vans would get dinged up, but they were white so it was easy to match with a rattle can of Rust-Oleum. Anyone here have any success with this low budget method?
Now back to the taillights. I have scoured the local junkyards and searched online, but have not been able to find anything. All those people who said we would have a hard time finding parts for the SAAB have not tried finding them for a Starlet. We are guessing that since the car was only imported to our shores for a few years that there really isn’t a demand for parts today. Does anyone here have a Starlet with taillights you could spare sitting in your backyard?
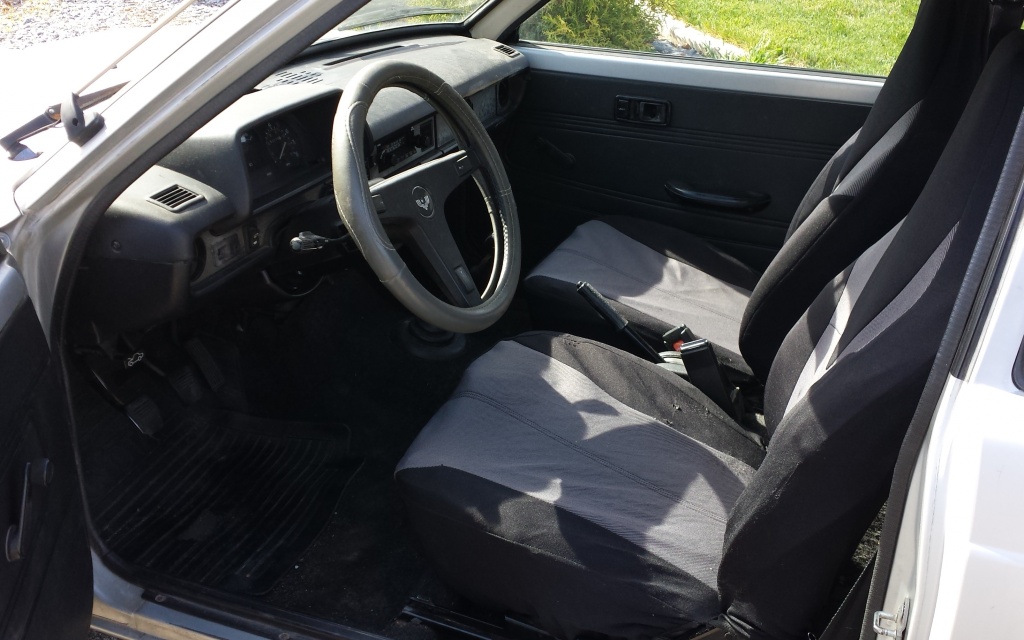
The back seat may look great, but the front seats are totally trashed. Although Toyota was known for building robust and reliable mechanics, I don’t believe the same can be said for their vinyl seats. The foam is shot too and unlike many popular cars, we can’t just call up a parts house and order a new seat bottom. $1,500 to have them redone seems steep to me and I hate seat covers, so any bright ideas?
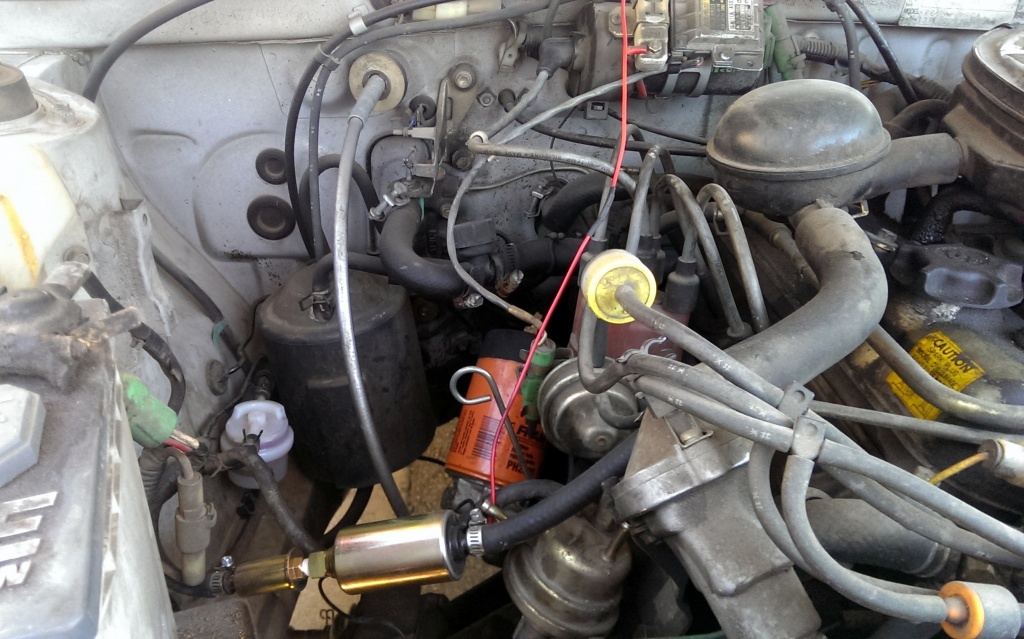
Talking about limited parts availability, we can’t even locate a mechanical fuel pump for this thing. There are sites online that say they have them, but both times we placed orders we were informed later that the part is no longer available. We would just leave the electric fuel pump that is currently in place, but it was installed wrong so it floods the carb more often than not. The previous owner’s mechanic didn’t bother to install an oil pressure cutoff switch either so we could have a fiery mess on our hands if we were to ever get into a wreck. So we should probably fix that.
Obviously we can’t expect a $750 car to be perfect, but by fixing the little things we are much more likely to see this car still on the road in a few more years. We have found that it is much more fun to include all of you in our projects even if the cars used aren’t that exciting. So, what do you guys think? What items should we fix and what should we leave alone?
Starlet Project Updates:
- Part 4 – All sorted
- Part 3 – Listed for sale
- Part 2 – Advice needed
- Part 1 – Introduction

for the fuel pump i would try a toyota dealer and see if they can get one and for how much. the fuel pump like the tail lights may have been used on more then 1 model. a interchange book might help.
as for the paint/minor rust i would leave the dents and just clean and seal the paint, both on the outside and inside, so it does not rust further. the seats is about finding any set with tracks that will bolt in ( color does not matter ). and again with the seats it will be what else did toyota use them in and/or how new can you go.
sorry i can not help more but i was never around them. but i wish i had found that car for that money. i would not be driving it much on the street. i would however be autocrossing the daylights out of it. find some used sticky low profile tires and see how fast you can go. be better then a sprite/midget if you mess up and put it on it roof. maybe ground tow it with the saab to and from the events.
I guess I’m not too surprised to hear that parts are hard to come by for this car. I saw an interesting deal a few years ago on a mid ’70s Datsun B210 sedan. I decided to do some parts checking online and found out pretty quickly that there wasn’t tons of parts out there for them, nothing reproduction because no one is interested in restoring them. What was out there was not particularly cheap either. I was alittle taken aback at first because these cars were EVERYWHERE when I was a kid. They were as common as VW Bugs, heck they were pretty much in line with a VW Bug back in the day! Then it dawned on me that I couldn’t remember the last time I saw one on the road, but it must have been 1980-something, then I remember how bad these things rusted. It all started to come together…
At any rate, I’m sure you’ll be able to score some lens for it somewhere on the cheap. Even though they are hard to find, there also isn’t much demand for them either.
Maybe seats from another Toyota would be the same or close? How about some aftermarket seat, such as can be found on the VW aftermarket?
Bodywork wise, I think it’s time for a trip to Harbor Frieght for some body hammers, dollies, maybe a $100 air compressor and a $40 spray gun? The trick to body work is patience and practice. If you start getting frustrated and want to rush the job, it’s time to stop and try again another day. Bodywork can be just as rewarding as mechanical work, although messier. Just remember to load up on dust masks for sanding and charcoal masks for painting. You, too, can make bondo your friend!
Have you thought about taking it to a boat shop for the seats? They have the equipment to build them and they’d be glad to do it in the off season.
maybe Hemmings would be a good source or if there are any Toyota fan Facebook pages ??
If you like I can check with the guy who reports that junk 360s are plentiful for parts. Maybe he knows of some Starlets he could pluck parts off of. Oh and shipping from Japan is surprisingly cheap if you do it the cheap way and wait a month or so…
for the seats… just grab some from another car.. bound to be something that fits… fiero or some other “surround” seats
i agree on the bodywork… either take the opportunity to buy the tools and learn it or just protect it… it IS a 750 car after all.
taillights… those look like others from that era… what about a retro fit from a cavalier or another toy from then
just some thoughts from snowy ontario
Ok, ready? Here we go!
Someone in So Cal will have the tail lights. Start a search for import salvage yards in So Cal, try a Craigslist search engine, let google help you find a forums/website for the cars (there’s a site for everything).
Seats: Salvage seats are the answer. Play your cards right and score major league seating! Ford put Recaro’s in Mustang’s, Escort’s and some other cars in the 80’s and 90’s. Keep your eyes open for a pair of Miata seats. Hunt Craigslist for seats. Mounting is WAY easier than you think too: a flat plate of aluminum (1/8 inch max) attached to the seat and to the tracks makes the perfect adapter. Remove tracks from old seats and mount to floor in OEM location. Attach flat plate to tracks. Set seat onto flat plate, mark the location of seat attachment holes on plate. Drill, attach and enjoy. My Miata race car seat is mounted in a similar way, minus the seat tracks (not legal to have an adjustable seat in road racing)
Get hold of a fuel pressure regulator. The issue here is the carb requires only about 1.5 to 2 psi and probably 20-30 gallons per hour max. The pump probably goes up to 6 psi and 60 gallons per hour. An inexpensive fuel pressure regulator can cut the pressure and flow rate and that problem is solved. The performance wall of parts at your local parts store will have one of these.
Sorry I’m not much help on the body other than this: Tie chain to body and tree. Drive away quickly. Dent/wrinkle pulled. Enjoy playing with body filler.
fuel pump…you may be able to physically match one. The motor should be either a 3k or 4k motor which was also in a corolla (1981-1983) and I know its shot in the dark but a 1987 Toyota Van had a 5K version.
Seats can be redone alot less and I mean alot….but that also depends on where you are located. I have seen Supra seats from 84-85 model years. I would(money permitting) temporarily put something else in and reupholster to OEM condition but thats me
Body…fix it…anywhich way you can but fix it a good as you can to save it of rust. It is well worth keeping…
Im a big fan of older toyotas…not an expert but have had 1980 Celica, 1987 Toyota Turbo SR5 pickup, 1984 Supra GTS, 1990 Toyota Supra, 1983 Corolla, 1990 Toyota Truck(full show truck) and a list of others…
PS good luck with the taillights….if I come across I will let you know
Hi we have a lot of them cars here so can get any part u want
1982 Toyota startlet 4kc. Looking for under the hood emission part and original carburetor.
You can run a Toyota into a brick wall but, other than that, they are hard to kill. Keep watching the pick-a-part boneyards for the interior pieces and you WILL find them. It might take awhile. You’ll be amazed what people throw away. You might even find a granny car for a parts donor real cheap. This has always worked for me. Some beach towels would look nice on the seats. It will do for now and they are washable.
you probably need an electric pump that has a max. pressure of 5 psi or less.there are available on the specialty market regulators which can adjust fuel pressure to any you need.
I agree with Bryan, there’s a huge Japanese car culture in SoCal. Someone there has the parts you need. Also, pick up a copy of Hemmings Sports and Exotic Car magazine. Mike Bumbeck the associate editor has one. I’m sure you could reach out to him and tap his network.
http://www.ebay.com/itm/83-84-STARLET-RIGHT-PASSENGER-SIDE-TAIL-LIGHT-/130896960026
pics by request but seller has good feedback. gl!
For the taillights, I would try the forums over at “Japanese Nostalgic Car”. Someone may have a set they are willing to sell if you post your needs. As to the bodywork, yes I have used Rustoleum to patch the peeling Cloud White paint on my Frontier, no it won’t work on the Toyota. The color won’t match any spray can silver since it is now very faded. If it weren’t, you could get away with having a local paint supply shop (like Finishmaster) mix you a custom spray can of paint.
The biggest problem though is that the passenger’s taillight damage is more extensive than you think. It appears to have sent the shockwave through the quarter and the panel might need to be pulled professionally. If you insist on doing it yourself, I would back it with something like a piece of angle iron and pull it gently using a chain and another vehicle. This will take two people as it is not a big distortion and you will need to have someone tell you when to stop. Once you get the metal into shape, you can try to mud it and shape it manually, but my preferred tool for the heavy filler shaping would be an air file in this case. The minor contours can then be done with hand sanding. I usually use a paint stirring stick wrapped in sand paper for most of it as it allows a fair amount of control. Once you get close, guide coat it with a mist of black spray paint and go down to 220 to get it all flatted off. After that, spray some etching primer on it, followed by 3-4 coats of primer surfacer. Let this set up for a while and then block it again. You will need to do this several times to get it right. Once you have it smoothed to a level you are comfortable with, Lay down another few coats and let it sit in the sun for a few days. This will help minimize shrinkage when you do your final sanding, which should be with 600 grit. Just don’t let it get wet if you are using a lacquer based primer as it will rust the metal underneath! After that, you will need to use a sealer over the area you plan to paint if using a paint that will react to the materials already on the car. When I paint a car, it is something I usually do as a matter of course since I don’t want to have a lifting reaction that will lead to extensive stripping and reworking.
Oh, and I looked for a Toyota 4k fuel pump and found 3 on EBAY, ranging from $70-85. Here’s one of them: http://www.ebay.com/itm/TOYOTA-COROLLA-KE30-KE35-TE31-TE37-3K-4K-FUEL-PUMP-NEW-/310236280514
No such luck on a tail light though. You’ll probably need to search EBAY several times a day for a few weeks until one shows up.
Your engine should be the 4K series which Toyota built by the thousands. If you search EBay you will find pumps available in Thailand, Philippines and Australia. These engines were used in the Corolla and the Lite Ace as well as other Toyota products. Try Gumtree or Craigslist and if you need one from OZ let me know and I can send it through.
The seat will be to expensive to post from OZ so keep looking locally.
We did not get that rear wheel drive Starlet model here so I know there is no chance of me finding tail lights.
Of course you could also junk that little 1.3liter and bolt in a twin cam Toyota screamer.
Maybe a pair of 240z seats would look the part? They shouldn’t be to hard to make fit.
Best of luck with this project.
I think the Corolla shared a ton of parts with the Starlet. It was just a FWD Starlet for the most part. JNC forums will be a ton of help for parts and advice.
I have had success in the past getting custom cut foam replacement parts from a shop that does boat canvas. They also make cushions for boat interiors so auto seats are not much of a stretch. Wife has also had them make cushions for porch furniture. Good luck…..
The bodywork, right side quarter panel needs to be pulled with a frame machine, nothing elaborate but non the less it needs to be pulled, this is critical because in order for the tail light to mount & properly seal the quarter / rear body panel distortion needs to be corrected. Fail to do this properly & water will seep under the poorly fitting tail lamp & run down inside the quarter & settle at the bottom eventually rusting out the lower quarter panel, the more rainy/ damp the environment the faster the process happens. My advise have a professional do it. You will have to find a decent tail light first.
Why are the seats $1500.00 ? I know there is upholstery shops that would give you a better deal on seat restoration. I have had several of these cars all parts I needed were available at N.A.P.A. no source for the tail lights. Good luck.starlets are one of my favorite cars.
You’ll need to scour sites like 4AG.com for those hard to find bits. Cheap replacement racing style buckets can be had on ebay for around $300 (for the pair) delivered.
For the paint, go to an auto paint shop and have the color matched by computer. I have a parts store that takes the reader out to the car, takes a reading and mixes an exact color match–a half pint is about $15.
Keep your old electric pump and install a regulator. I put electric pumps on all my old cars, keeping the mechanical pump as well, but put a regulator in line to take the pressure down. As I recall, they are about $20.
Lights:
http://westernmass.craigslist.org/pts/4369257238.html
Listing is nearly 2 months old, act fast!
Fuel:
Stick with the electric pump, and use a pressure regulator.
Bodywork:
If you can acces the inside and bump that RR dent out, awesome. Otherwise you might need a dent puller. Nowdays dents are pulled with spot-welded posts, better than drilling holes as was done formerly. A bit of bondo, paint and sweat, and it should look OK. Just be happy that the fuel filler door was not damaged!
– These are great little cars. The rear dent at the tail light (Rt.) more work then you sound like you want to spend on it, I would cut it out, reshape it, or build new, weld it back into place. Either way you have a choice of less bondo, more fill vs. being solid with a better look. I know a lot of work, end result though, less bondo.
– Tail lights. Make your own. See these sites for more information,
1) http://www.alumilite.com/HowTos/TailLightMoldingNoEquipment.cfm
2) http://www.ehow.com/how_7568399_make-mold-taillight-lens.html
3) http://www.lowbrowcustoms.com/page-view/tech_How_to_cast_custom_tail_light_lens/
– Seat covers. Build them up yourself or pay to have them done. The foam can be purchased nearly anywhere upholstery materials are sold. Or take form from a throw-away chair or couch. The process sounds like it might be a learning curve for you, but not that hard to accomplish with some basic tools.
– Needed parts. I’d keep looking, someone has what you need. I had a little car once, not all that old, but parts for it were scarce. After much searching I came across an outfit that catered to just my little car. They had everything I couldn’t find everywhere else.
Foam not form. Sorry.
You need to visit http://www.car-part.com
This is the search engine for the auto recycler industry.
I went there and searched for taillights. There were many, many sources. You should be able to get everything you need.
John
For what is usually cheap prices on factory parts try Amayama Trading Company. I bought a part for our LX470 A LOT cheaper than dealership, and shipped from UAE. Excellent service.
Wow, great suggestions guys! The collaborative nature of this site makes it so much more interesting than if I were to just act like I knew best. Multiple heads really are better than one!
I went ahead and used Jim’s suggestion of looking for alternative part numbers and scored a new mechanical fuel pump for $25 on eBay! It is an aftermarket one (Airtex 1319), but should work just fine.
As for tail lights, there are a lot of 83-84 units out there, but they were a little different design than the ones used in 1982. I did checkout car-part.com which was recommended by John and a facebook follower. Through it I found a yard in Lewiston, Idaho that has a good pair for $75 shipped!
Later today I plan on getting some estimates for the upholstery and body work. You guys mentioned that the quote I got seemed high, so I figured it might be good to get some more before attempting the job myself. Can anyone recommended shops here in the Treasure Valley?
If they are still too high, I will make a trip to Harbor Freight to pickup some body hammers and then go over to the junkyard to source some seats. So, we now have a good plan of attack thanks to all of you. Also, I love Jim’s idea of taking the car autocrossing after we get it all sorted out. That would be a great conclusion to our journey!
Sounds like a great project! I used to ice race IIRA, & road race SCCA ITC these, won some championships – what a great car!
While I don’t have many parts left, I do have a beautiful pair of ’81/’82 taillights you’re looking for, as well as all the glass, a grill, maybe a rear window wiper motor & front suspension bits. Sorry to say I threw away many seats. We also used a Faucet fuel pump – get from Napa – they work better than original. Also, if you put on a webber 32/36 dgv, you must weld the adapter onto the manifold & port manifold, otherwise it’s not worth it – they will give a nice bump in power! I could go on forever… Send me an email & I’d be happy to help!
Wish I had seen your comment before ordering the taillights and fuel pump! Any other tips you can give Steve would be greatly appreciated!
Not sure about your plans for the car after the Saab is back online, but if you think it might end up sitting for long period of time without being started, consider leaving the electric fuel pump downstream of the mech. pump and install a simple on/off switch under the dash to power it. When the car has been sitting, you can hit the switch and pump will fuel up to the carb without draining the battery and wearing the starter. I did this to my 63 Studebaker years ago and I doubled my battery life. Also helpful if the car tends to ever vapor lock on hot days. I seem to recall that one type of pump can handle a mech pumping through it, and another type can’t – I cannot remember which was which, but I’m sure another reader can fill in the blanks!
speaking of journey, it might be time to check to see how far it is from where you live to the SCCA solo nationals. and who is faster you or josh on an autocross course?
I don’t think it makes sense to have a body shop do the work. They will most likely charge you something close to what you paid for the car.
You might call some local high schools and see if they have an automotive shop class that might do the work for you for the cost of materials and a donation to the class. Would make a great story for the barnfinds.
The seats can be recovered for a lot less than $1500. That cost is ridiculous unless you are covering them in rich Corinthian leather that Ricardo Montalban has stashed away.
There are some VERY nice seat covers out there. Just have to pay more than the cheapo ones. Any upholstery shop should be able to add foam to the seats, and possibly recover them. Just let them know you will R&R them.
John
You are probably right about the bodywork. Might have to just pound the dent out enough to get the tail light and side marker to sit right.
I used Jims Auto Upholstery in Nampa to redo my 64 bug a while back. Really awesome guys and they do really nice work, and very reasonable. Might be worth a call to see if they would be up for the challenge.
http://www.jimsupholstery.com/
All the best on the Starlet! Looks like a fun project!
Just gave them a call and their prices were much more reasonable. I also contacted Boise Car Upholstery and they were in the same range too. Now I just need to decide if it would be worth the added expense.
This guy may be able to steer you right on parts.
http://www.needfulthings.net/tulsaturbo/myblog/index.php?mode=viewcat&cat_id=10
If you ever get tired of it, take it to a local drag strip and put a for sale sign on it “$5k or best offer”. There is a sub culture of racing guys from Puerto Rico that snatch these things up all day every day and make sick drag cars out of them.
I noticed that when I was using the ‘Net to hunt for a tail light for Jesse. Most seem to opt for rotary power, but there are some twincam 4’s stuffed in as well. YouTube has a bunch of video examples of Starlet drag cars. The short wheelbase seems to cause some challenges at straight line stability, though. Perhaps that is just due to the nature of the chassis work installing the rear diff?
I was going to suggest checking JunkYardFind for your parts, but I see that you have sourced some. I do have something to relate as far as straightening the rear fender. Years ago when I was just out of high school, I straightened a dent in the rear corner on my mom’s 68 Cutlass. I used body hammers, dolly’s and other assorted tools, but the main tool to pop out the dent was a bottle jack and pieces of 2X4 lumber. Strategically placed 2X4’s at the base and top of the jack allowed force to be applied to the dent to push it back out to near normal shape. A bit of hammer a dolly work perfected the job. The jack objected to working in a horizontal position. But as long as the top was higher than the base it did the job. Every car guy should have a bottle jack or two on the shelf.
Try to find a passengers seat and use the forms and covers on the drivers side.
have you checked into having new taillight lenses 3-d printed? the maker community is really embracing this technology. good luck to you.
Old thread, @ notpurple. That car is long gone…. But your suggestion has merit for future use. The problem might then be finding a good one to scan and duplicate?